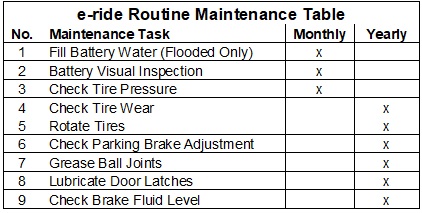
Battery Water Filling
If your vehicle is equipped with flooded batteries the battery cells need to be checked and filled on a routine basis. It is recommended that this be done monthly. Perform this in a well-ventilated area that is dry and well lit.
To fill the batteries:
1. Fill
the provided tank with distilled or de-mineralized water.
2. Open
the hood and locate the battery water fill hose. It has a red cap on the hose
and is strapped to the wiring harness. Take the cap off the connector.
3. Place
the supplied 2 ½ gallon tank on the roof of the vehicle with the tank fill hose
hanging over the front of the windshield.
4. Connect
the tank female connector to the male connector from the vehicle. To connect
them just press the two connectors together until it clicks.
5. Keep
filling the water bottle as necessary to continue filling the batteries (it
fills the best with a full tank). The
wheel in the tank fill hose will continue to spin fast as long as water is
going into the batteries. Once the wheel
has slowed down or stopped, the batteries are full of water. Disconnect the water bottle hose by pressing
the button on the coupler and re-attach the battery pack fill hose to the
vehicle with the cap in place.
6. Never
leave the water tank hooked up to the vehicle unattended. Make sure to
disconnect the hose immediately after the water flow wheel slows down to where
you can see the whole propeller.
Battery Pack Visual Inspection
Battery Pack Access
**Important Safety Note: Before
removing any parts to access the batteries for inspection, disconnect the main
battery disconnect located in the front passengers side wheel well. Always remember when inspecting the batteries,
that the main battery disconnect only disconnects power to the vehicle and does
not disconnect power from battery to battery.
Batteries can produce explosive gases which can cause personal injury. Therefore, do not allow flames or sparks to come near the battery. When working near the battery, always shield your face and protect your eyes. Always provide ventilation.
1. Cab Compartment
Remove the center arm rest pad and console. The park brake lever (if ratcheting handle type) will have to be in the engaged position so that the handle is raised in order to remove the center pad (and tunnel cover once the console is removed later). Disconnect the wiring harness plug from the console. Then the console can be slid back slightly, lifted up and removed. The heater tube hoses might have to be removed from the console if the vehicle is equipped with a heater. The center aluminum tunnel cover, which is attached by Velcro, can then be lifted off.
2. Flatbed Access Panel (EXV2 only)
On an EXV2, the cab access area only reaches a limited amount of the batteries, so there is another access point from the top of the flatbed. Remove the panel in this area by releasing the four quarter-turn fasteners that secure it. The batteries can all be removed through these access areas, but some of the following steps may have to be shuffled depending on what is easier for each person who attempts it.
Inspection Procedure
1. Make
sure main battery disconnect has been shut off.
2. If
your vehicle is equipped with flooded batteries inspect the fluid level in each
cell by looking to see how high the white float is sitting in each cell
cap. If a battery cell is full of water
the white float indicator will be at the top of the fill cap. If the battery cell needs water the white
float indicator will be recessed into the fill cap. Before checking the level of these floats,
rock the vehicle slightly to free any stuck floats.
3. Inspect
for any loose connections by wiggling the top post battery cables where they
clamp onto the top of the battery. If you find any signs of a loose cable
connection, they must be tightened by a trained professional before the main
battery disconnect is turned back on.
*Note: The main battery disconnect does not disconnect power from
battery to battery.
4. Inspect
for any acid spills or corrosion to the battery posts or cables. If corrosion exists, the aluminum or metal
components will turn white in color. All
acid or corrosive metals must be cleaned appropriately by a trained
professional before the main battery disconnect is turned back on.
5. Replace all components back into the vehicle before turning the main battery disconnect back on.
Tire Inflation
Under-inflation increases tire
flexing and can result in tire failure.
Over-inflation causes a tire to be too stiff. Objects on the ground could puncture the tire
more easily and tire failure could occur.
Unequal tire pressure can cause steering problems and could also cause
you to lose control of the vehicle. Take
these steps set tire pressures:
1. Use
an accurate tire pressure gauge.
2. Check
the tire pressure when tires are cold, after the vehicle has been parked for
over an hour or has been driven less than 3 miles.
3. Adjust the tire pressure according to the
recommended specifications listed on the sidewall of the tires and on the VIN
label on the driver’s seat base (35 psi).
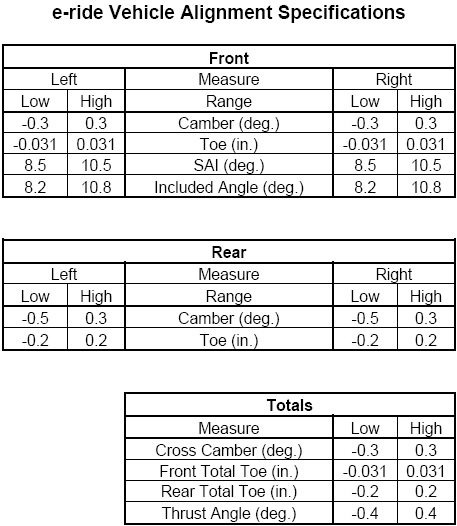
Tire Wear and Alignment
At least once a year, check your
tire alignment to the specifications listed. If your alignment is not correct, this could
cause steering resistance and rolling resistance which would cause a decrease
in the range and overall performance of the vehicle. This can also lead to uneven tire wear mostly
seen on the front wheels. If there is a
rear tire wear problem, this is probably due to major damage to one or more
components in the rear suspension causing the misalignment of the rear
wheels. An alignment check for the rear
wheels is suggested along with the fronts.
Replace the tire when the tread
depth is at or less than 2/32” of remaining tire depth. Replace only with the original tire
size (P215/75R14). Tires smaller or larger than the original size may affect
the accuracy of the speedometer, performance and life of the vehicle.
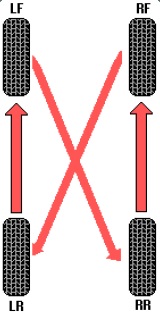
Tire Rotation
Because each of your vehicle’s tires perform different jobs, they often wear differently. To make sure the tires wear evenly and last longer, rotate them on a regular basis. Rotation is suggested, at a minimum, on a yearly basis or about every 3000 miles, whichever comes first. See diagram for proper tire rotation.
Parking Brake Adjustment
The parking brake is a manual,
mechanical way of actuating the rear brakes and will eventually loosen the
holding power as the brake shoes wear.
Adjustment needs to be made once the handle reaches the end of its
travel and the proper brake tension is not set or this tension is not reached
in the desired amount of handle travel.
There is no other parking mechanism on the vehicle that holds it in
place when parked, so it is important to adjust as soon as it is needed. The adjustment for the park brake can be
found under the vehicle at the equalizer junction point.